
Best Whistler Hikes
Whistler is home to some absolutely stunning hikes and the best part is that there are so many Whistler hikes that there’s something for everyone!
Without a doubt, some of the best BC hikes are in Whistler. From easy, mostly flat hikes, to day-long hikes and Whistler backpacking trips there’s enough hiking in Whistler to keep you busy for years!
If you’re planning a trip to Whistler and looking for some of the best Whistler hikes then you’re in the right place. Below, you’ll find my pick of the best Whistler hiking trails from south of Whistler to the north.
Whistler Hiking Essentials
Before you go hiking at Whistler, there are certain things you should know. Paying attention to the below information will help keep you safe and keep the trails enjoyable for others too.
When is the best time to hike in Whistler?
Whistler has quite a short hiking season, especially if you’re looking to do some of the alpine hikes. It really depends on when the snow melts and when it starts back up again! Sometimes this window is from the middle of August to the middle of September, but you’ll usually get at least 2 months of snow-free hiking.
In all, the best time to hike in Whistler is in the summer: from late July to mid-September. Checking trail reports (such as on AllTrails) or the webcams up on Whistler Mountain is a good way to see if there’s still snow about.
AllTrails is my go-to hiking app for finding, planning, and navigating while I’m out on the trails. With offline maps on AllTrails+ you can be confident you’re still on the right track, even without mobile signal.
If you’re looking to do some of the easy hikes in Whistler, such as the Train Wreck, or Lost Lake, then these are snow-free earlier on in the year (usually around May), and the same goes for lower elevation hikes such as Cheakamus which is often snow-free in June.
What to pack for hiking in Whistler
As with any hike, you need to make sure you’ve got your 10 essentials to help keep you, and others, safe out on the trail.
If you’re doing a day hike, check out my day hiking packing checklist. For backpacking and overnight hikes near Whistler, this Berg Lake packing list covers everything I’d take with me.
Bear safety in Whistler
There are A LOT of bears in and around Whistler including both black bears (more common) and grizzly bears. You should ALWAYS carry bear spray with you and carry it in an easy-to-access place. It’s no use to you at the bottom of your backpack!
Check out this post for bear safety while adventuring.
Always leave no trace!
Practising leave no trace principles means leaving everything as (or better) than you found it. If you carried something up the mountain you can carry it down.
Don’t take anything with you (apart from trash) and stick to trails instead of trying to avoid mud, or forging your own path, to protect the ecosystems around you.
Be AdventureSmart
Be adventure smart: Remember to respect the terrain, environment, and other users while you are enjoying the trails. Follow the three Ts—trip planning, training, and taking the essentials AdventureSmart is a great resource to help you get informed before heading outdoors.
NEW 2024 UPDATE!
You will need a day pass to access popular BC parks, Garibaldi (from June 13 to September 2, 2024, and on weekends and holidays only from September 3 to October 14, 2024), Joffre (May 16 to October 31, 2024. Closures: April 30 to May 15, June 14 to June 23, September 3 to October 3) and Golden Ears (Friday, Saturday, Sunday, and Monday only from May 3 to September 2, 2024,). The passes are free and available from 7 am two days before your visit. All details & information here.
Whistler trails map
Since this post spans a huge area south to north of Whistler, there isn’t one map that shows all the hiking trails in Whistler included in this post. The best place to check routes is usually AllTrails.
They show you the hikes nearby and you can download the maps to your phone so it’s like having a Whistler Blackcomb trailmap in your pocket.
This Blackcomb hiking & Whistler trail map includes the hikes that are in the winter skiing area.
How to get to Whistler
Most people will likely get to Whistler from Vancouver. Driving from Whistler to Vancouver takes about 1.45-2 hours depending on traffic. Some of these hikes are a little closer, and some, such as Joffre Lakes, will take around 3 hours to get to.
You’ll need to take Highway 99, the Sea to Sky Highway, all the way from North Vancouver to Whistler and Pemberton.
Check out this post for all the cool places you can stop along the way!
Best hikes south of Whistler
Some of my favourite Whistler hikes are just south of Whistler. Chances are you’ve probably heard of them too!
Brandywine Falls

Brandywine Falls is one of the coolest waterfalls in the area. The waterfalls are 70m tall and you can hike from the small parking lot just off the highway towards the falls to witness the power of the water as it falls into the canyon below from the wooden viewing platform.
Brandywine Falls Trail Stats:
- Distance: 1km round trip
- Duration: 30 mins – 1hour (depending on how long you want to admire the falls for!)
- Elevation: minimal
- Difficulty: easy
Garibaldi Lake
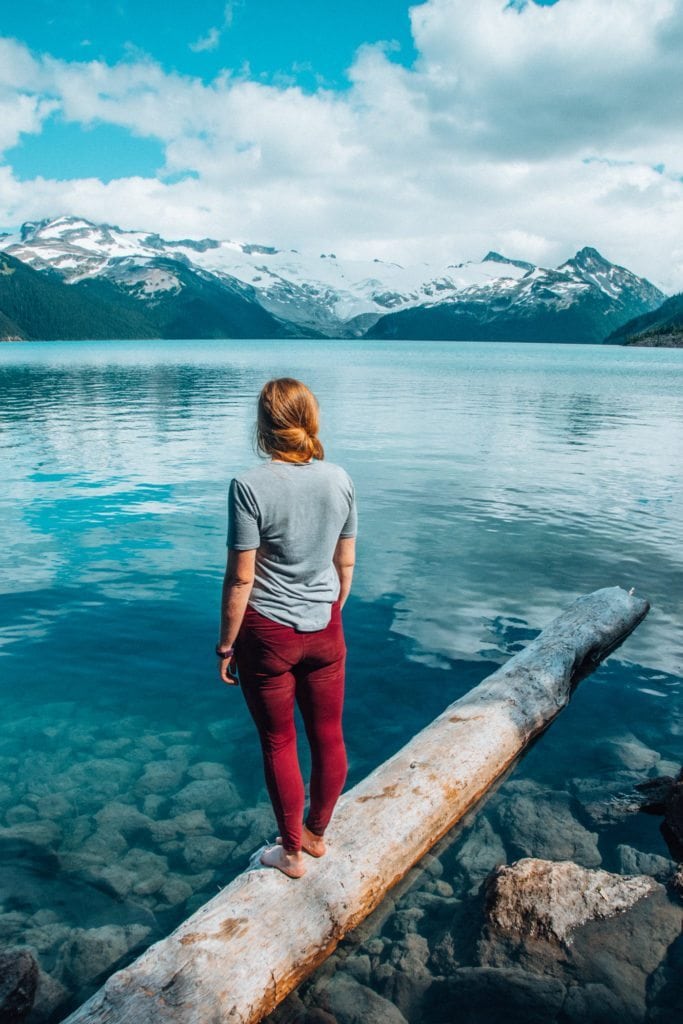

Garibaldi Lake is one of the most well-known lakes in the area and one of my favourites (there’s a reason it’s on my best hikes near Vancouver post! I’ve done it a couple of times now and it never fails to impress me.
The trail starts with several km of switchbacks through the forest before opening up to a viewpoint and the final stretch to Garibaldi Lake itself. The lake is an incredible colour (and incredibly cold too since it’s glacier-fed).
It gets busy here, especially during the summer, and you’ll need a BC Parks Day Pass between June and October in order to visit it. Rangers will check as you drive up.
This hike can be done as a day hike or as an overnight trip. The latter is best if you’re planning on extending your hike to Panorama Ridge or Black Tusk.
Garibaldi Lake Trail Stats:
- Distance: 18km
- Duration: 5-7 hours
- Elevation: 820m
- Difficulty: Intermediate-Hard
- BC Parks Day Pass or camping reservation needed
Panorama Ridge

Panorama Ridge is absolutely beautiful. Garibaldi Lake is stunning, but being able to look down onto it from Panorama Ridge gives you a whole new appreciation of its beauty!
This is another place I’ve been fortunate to go to a couple of times and even the journey to the ridge is stunning. You’ll pass through Taylor Meadows which get lovely wildflowers during the summer months, and then do the final climb up above Helm Lake.
It’s a challenging hike, especially if you plan to do it in a day, but well worth it!
Both times I’ve done this I’ve seen at least one bear so make sure you’re making noise on the trail!
Panorama Ridge Trail Stats:
- Distance: 30km
- Duration: 10-12 hours
- Elevation: 1520m
- Difficulty: Hard
- BC Parks Day Pass or camping reservation needed
Black Tusk


It’s hard to choose between which has the better view Black Tusk or Panorama Ridge. As much as I love Panorama Ridge, Black Tusk’s 360-degree views probably win for me.
You can see Black Tusk from all over the Vancouver area (including from the Sea to Sky highway sometimes). It’s super recognizable and was formed from lava from an extinct volcano.
You can hike to the base of the Tusk on a maintained trail and confident and experienced hikers, ideally with rock climbing experience and helmets, can continue to climb to the top of Black Tusk itself. The final stretch involves some climbing up the ‘chimney’ which is sharp, narrow and quite exposed.
- Distance: 29km
- Duration: 10-12 hours
- Elevation: 1740m
- Difficulty: Hard with climbing required
- BC Parks day pass or camping reservation needed
Best hikes in Cheakamus Crossing
Just a little bit further up the road is your next entry point into Garibaldi Provincial Park and some Whistler trails. Cheakamus Crossing is near Function Junction in Whistler and well signposted.
Loggers Lake Trail

Loggers Lake was a trail we added to the end of our bike ride to Cheakamus Lake one year. It’s accessed off the logging road within Whistler Interpretive Forest and has one steep section to climb up to the Lake. The Lake itself is quite small and there’s a path the entire way around.
It’s a nice peaceful spot to enjoy.
Loggers Lake Trail Stats
- Distance: Under 3km
- Duration: 30 mins – 1 hour
- Elevation: 108m
- Difficulty: Easy (1 steep section)
Crater Rim Trail
The Crater Rim trail can be an extension to the Loggers Lake trail if you wish to look down onto Loggers Lake. It can also be combined with the Riverside Trail too for a nice several-hour-long Whistler hike.
Crater Rim Trail Stats
- Distance: 4.5km
- Duration: 1-3 hours
- Elevation: 230m
- Difficulty: Easy-Intermediate
Riverside and Farside Trails
Another easy loop trail in the Whistler Interpretive Forest is the Riverside and Farside Trails. You’ll follow along the Cheakamus river through the forest and cross the Cheakamus suspension bridge to complete your loop back along the river.
Riverside and Farside Trail stats:
- Distance: 6km
- Duration: 2-3 hours
- Elevation: 90m
- Difficulty: Easy
Trainwreck Whistler

The Whistler Train Wreck trail was one of the first hikes in Whistler that we did. It’s a super cool hike and features a trail in the middle of the forest. It’s believed the train derailed in the 1950s and now the carriages have been covered in graffiti adding some colour and fun to this easy Whistler hike.
Whistler Train Wreck trail stats
- Distance: 3km
- Duration: 1-2 hours
- Elevation: Minimal
- Difficulty: Easy
Cheakamus Lake Trail

The Cheakamus Lake trail is often one of the first hikes to become snow-free making it a great early summer hike. The lake is, as with many in this area, stunning!
What makes this trail different from similar hikes around Whistler, is that you’re allowed to ride a bike to it. You’ll want a mountain bike or a good gravel bike, but being able to cycle the mostly flat trail is a fun way to explore the area.
Cheakamus Lake stats:
- Distance: 14km round trip
- Duration: 2-4 hours
- Elevation: Minimal
- Difficulty: Easy
- BC Parks day pass or camping reservation needed
Helm Pass and Helm Creek Trail
Starting from the same trailhead as Cheakamus Lake in Whistler Interpretive Forest, Helm Pass is an alternative (albeit longer) route to Garibaldi Lake, Panorama Ridge and Black Tusk.
You’ll cross over the Cheakamus River and then climb up through the forest, past Helm Creek campground and towards the flat terrain of Helm Pass.
Helm Pass Trail Stats:
- Distance: 25km
- Duration: 7-10 hours
- Elevation: 930m
- Difficulty: Hard
- BC Parks day pass or camping reservation needed
Callaghan Valley Trails
Callaghan Valley is often overlooked when it comes to hiking near Whistler but this area is where some of the best trails are. They’re typically quieter than the alpine trails from Whistler Village but offer the same incredible views. Park at Whistler Village Olympic Park to access the hikes
Madeley Lake
Another hidden lake in the Callaghan Valley area is Madeley Lake. Madeley Lake is accessible by car (so you don’t even have to hike) but you’ll need a good 4×4 and offroad driving know-how to navigate the waterbars you’ll likely encounter on the drive.
Alternatively, you can hike to Madeley Lake from Whistler Village Olympic Park and go via Hanging Lake too. If you’re a ski tourer you may be familiar with this area since it’s a popular ski touring route too!
Hanging Lake & Madeley Lake hike stats:
- Distance: 10km
- Duration: 3-5 hours
- Elevation: 590m
- Difficulty: Hard
Cirque Lake
Cirque Lake is an unusual hike since it’s only accessible by water! You’ll need to launch at Lake Callaghan and then paddle your way across the lake to reach the trailhead for Cirque Lake.
It’s a hike with some very steep sections including some with ropes. If that sounds like fun, this could be a great option for you!
Cirque Lake hike stats:
- Distance: 4km
- Duration: 3-5 hours
- Elevation: 300
- Difficulty: Hard
- Note: You’ll need a good 4×4 to get to Callaghan Lake
Ring Lake & Conflict Lake
Journeyman Lodge, which is a popular backcountry skiing destination, is near Conflict Lake which is just a couple of kilometres away from Ring Lake.
Hiking Ring Lake and Conflict Lake involves a bit more route finding than some Whistler hiking trails since they’re less trafficked and maintained, but the reward is worth the effort.
Ring Lake & Conflict Lake hike stats
- Distance: 19.2km
- Duration: 5-7
- Elevation: 760m
- Difficulty: Hard
- Note: You should have a 4×4 or 4wd to navigate the bumpy logging road to the parking lot.
Best hikes west of Whistler
Just before you get to Whistler village proper, there are some beautiful hikes to check out on the western side of the road (to your left as you’re driving up).
Tonic Peak & Mount Sproatt
If you’re a mountain biker, you may have heard of the Lord of the Squirrels trail to the west of Whistler. The trail is absolutely beautiful, though challenging with several hours of steep incline followed by some fast and techy descent.
If you’re not a mountain biker, hiking up to Tonic Peak and/or Mount Sproatt will provide you with stunning alpine views from an area that’s not super frequented.
It’s best to hike up Into the Mystic and then come down the same way. If you do decide to go down Lord of the Squirrels keep your eyes and ears open for mountain bikers!
Tonic Peak & Mount Sproatt
- Distance: 31km
- Duration: 8-11 hours
- Elevation: 1550m
- Difficulty: Very hard
- Note: This trail is often closed for grizzly bears in late summer.
Rainbow Lake and Rainbow Falls
Rainbow Lake is a beautiful lake on the western side of Whistler. The trail climbs through the forest and passes Rainbow Falls along the way. As you continue climbing you’ll reach the alpine Rainbow Lake. Though it may be tempting to swim – don’t! – this trail is within the Whistler watershed so swimming is not allowed.
You can also end your trail at the falls if you don’t want to climb up to the lake.
Rainbow Lake trail stats:
- Distance: 16km
- Duration: 5-7 hours
- Elevation: 850m
- Difficulty: Hard
Best hikes from Whistler Village
If you’re visiting Whistler and staying in the village, you won’t even have to drive to visit some of the best hikes in Whistler!
Lost Lake

Lost Lake, Whistler, is super close to the centre of Whistler village and you can get there easily by walking or biking along the Valley Trail.
Once you’re at the lake, there’s a trail which takes you all the way around and you can stop partway for a swim, or relax on the docks.
In the summer (late July-ish), Lost Lake is home to loads of frogs and some of the beach is cordoned off to allow them to move around safely. They’re tiny and very easy to step on if you’re not paying attention!
There are a bunch of mountain biking trails in the area and paths through the forest to explore. Or, take a good book and chill out on the grass near the lake.
Lost Lake hike stats:
- Distance: 5km (around the lake)
- Duration: 1-2 hours
- Elevation: Minimal
- Difficulty: Easy
Singing Pass to Russet Lake
I have bad memories of Singing Pass having come down it at the end of my backcountry skiing trip on the Spearhead Traverse. However, I’m sure hiking it is lovely!
You’ll walk through the forest on a gentle climb, up through the valley and under the Peak to Peak gondola. Once you come out of the forest you’ll find yourself in the Alpine at the end of the Musical Bumps Trail.
You can either head up The Musical Bumps Trail and take the Gondola down. Or, if continuing on to Russet Lake, take one final climb up Cowboy Ridge then down to the lake, campground and Kees and Claire hut.
Singing Pass & Russet Lake
- Distance: 31km
- Duration: 1300m
- Elevation: 10-12 hours
- Difficulty: Hard
Blackcomb Ascent Trail
The Blackcomb Ascent trail is considered one of the steepest and harder hikes in Whistler. It’s not particularly long, at just over 6km, but boy is it steep! You’ll start off on the Little Burn, before taking Big Burn and then Heartburn if going all the way to the top of the gondola.
Luckily, you can take the gondola down once you’ve made you way to the top! There’s also the option to download from Blackcomb mid-station if you’re not sure you want to continue to the very top.
Blackcomb Ascent Trail
- Distance: 6km
- Duration: 2-4 hours
- Elevation: 1175m
- Difficulty: Very hard
Blackcomb Alpine Trails
The Blackcomb Alpine trails are accessed from the top of the Whistler gondola so you’ll need to buy a gondola ticket to get the Blackcomb Alpine Trails and then cross the valley on the Peak2Peak. You’ll cut out almost 2000m of elevation by taking the gondola and then emerge to an alpine landscape complete with glaciers, streams and wildflowers.
There’s Blackcomb Lake and the Overlord Trail, both of which have amazing views.
Blackcomb Alpine trail stats
- Distance: Varies, up to 10km would give you a good hike and views
- Duration: 2-4 hours
- Elevation: 200m
- Difficulty: Intermediate
Musical Bumps, Whistler
The Musical Bumps hike is one of the most well known and beautiful hikes in Whistler. You’ll walk along the ridge from Whistler Peak passing several lakes (Harmony Lake and Symphony Lake) and you’ll tick off several summits along the way too: Piccolo Summut Flute Summit and Oboe.
You’ll get the gondola up to the top of Whistler Mountain and the follow the route towards Russet Lake. Make it a loop by coming back on the High Note Trail, or take Singing Pass all the way back to the village.
Musical Bumps trail stats
- Distance: 19km
- Duration: 7-9 hours
- Elevation: 300m
- Difficulty: Intermediate – hard
High Note Trail, Whistler
Another great hike in Whistler is the High Note Trail. Mentioned above you can connect it with Musical Bumps for a stunning loop hike in Whistler, or do it as an out and back. It takes you from Whistler Peak down to the top of the Peak2Peak gondola. You can also make the hike shorter by taking Half Note.
High Note trail stats
- Distance: Intermediate
- Duration: 9.5km
- Elevation: 400m
- Difficulty: 2-4 hours
Best hikes north of Whistler
If you drive through Whistler towards Pemberton there are some more incredible hikes worth doing!
Joffre Lakes

Commonly mistaken as being in Whistler, Joffre Lake is around an hour further north of Whistler. Joffre Lake is incredibly popular and there’s now a BC Parks Day pass required to hike it which seems to be lessening some of the crowds.
Though many people describe this as an easy hike, there’s still some elevation and you do still need proper hiking gear. Don’t go trying this in shoes that aren’t suitable for hikes.
Joffre Lake hike stats:
- Distance: 10km
- Duration: 3-4 hours
- Elevation: 370m
- Difficulty: Intermediate
- NOTE: You need a BC Parks day pass or camping reservation needed
Wedgemount Lake


Wedgemount Lake is probably the hardest well-known trail in Garibaldi Provincial Park. It’s pretty long and has a very steep scramble section before you top out at the lake. It is, however, one of the most beautiful.
Once you’ve made it to the lake, definitely continue past it towards the foot of the glacier for stunning views!
Wedgemount Lake trail stats
- Distance: 14km
- Duration: 6-8 hours
- Elevation: 1,375m
- Difficulty: Hard
Parkhurst Ghost Town

Looking for an unusual hike in BC? Parkhurst Ghost Town could be the answer! The town of Parkhurst was abandoned in the 1960s. It’s a former logging settlement and you can still see some of the old machinery and buildings that were used at the time.
Parkhurst Ghost Town hike stats
- Distance: 5km
- Duration: 2 hours
- Elevation: Minimal
- Difficulty: Easy
Nairn Falls

Nairn Falls is a super impressive waterfall hike near Whistler. The easy hike from the parking lot is 1.5km long and takes you to a cool viewpoint from where you can watch the water plummet from 60m high!
Nairn Falls trail stats
- Distance: 3km
- Duration: 0.5 0 1.5 hours
- Elevation: Minimal
- Difficulty: Easy
Where to stay in Whistler
Whistler accommodation doesn’t come cheap and Airbnb in Whistler can be crazy expensive. If you’re able to travel mid-week you may be able to find a good last-minute deal through Booking.com, but if you’re going at the weekend then expect to pay quite a lot.
Whistler is also a lot bigger than you’d first think and the town sprawls out into different Whistler villages. While Whistler Village is the area that’s right by the lifts, most of the shops and restaurants, the other areas are more peaceful and there’s a shuttle service that runs from them to the village so don’t count them out.
There is also plenty of Whistler camping available especially if you visit in summer.
So with that, here are some of the best Whistler hotels:
- Whistler Village Inn & Suites: This Whistler hotel has a year-round outdoor pool and is right in the centre of Whistler Village, just 2 minutes walk away from the gondolas.
- Nita Lake Lodge: With an onsite spa, this hotel by Nita Lake in Whistler has the most incredible views in a peaceful location. It’s just 500m away from the Creekside Gondola which connects with the rest of the Whistler resort and there’s a free shuttle service to Whistler Village too.
- Pangea Pod Hotel: The best Whistler hotel on a budget is the Pangea Pod hotel which doesn’t sacrifice style either. This pod hotel in Whistler is in the middle of the village and offers both single and double pods.
- Summit Lodge Boutique Hotel Whistler: Another option that’s super close to the gondolas in Whistler Village is Summit Lodge in Whistler. The suites come with kitchenettes making them perfect as self-catering accommodation in Whistler and there’s a balcony with all suites.
FAQs about the best trails for hiking Whistler
What are the hardest hikes in Whistler?
Are there hikes in Whistler?
What is the easiest trail at Whistler?
Can you hike at Whistler for free?
Final thoughts on the best hikes Whistler has to offer
If you were looking for the best hikes near Whistler then hopefully you’ve found some you’ve yet to try in this list.
Some of the least well-known hikes Whistler has to offer are those around. the Olympic Park and Callaghan Valey. These are trickier since many require a 4×4, but they’re stunning and feel very remote.
Other easy hikes Whistler has such as Lost Lake, or Cheakamus Lake are great for travelling with kids or when you need something more gentle.
Or, if you want a challenging Whistler BC hiking trail then be sure to check out the likes of Wefgemount Lake or Panorama Ridge in Garibaldi Provincial Park. These hiking trails Whistler offers are some of the best hikes in BC and well worth the effort it takes to get to the summits!
Love hiking? Check out over 100 hiking guides from around the world including Vancouver and Banff, the Lofoten Islands, Tromsø and Scotland and England.
Last Updated on October 30, 2023 by Hannah
Hannah started That Adventurer after graduating back in 2013 and has documented all of her adventures since then. From backpacking South America to city breaks in Europe, a 3 month road trip across the USA in a self-converted van and 6 years living in Canada, you’ll find posts on all of this.
Hannah specialises in active travel and on That Adventurer you’ll find hiking, walking, biking, skiing and all sorts of active travel guides to allow you to see a destination in an adventurous way.
Now back in Europe, you’ll find new guides as Hannah and her husband spend the next year ‘digital nomading’ from Norway to Portugal, Switzerland to Scotland and places in between.


